Advanced Calendar Overlays
If you feel that you have a firm understanding of Calendar Overlays and how they work, you can also try another set of URL parameters for advanced Calendar Overlay embedding. This set of URL parameters will allow you to choose if your Calendar Overlay is showing when visitors visit your embedded calendar for the first time.
For example, let’s say that you have one calendar with two calendar overlays. Each overlay shows the events for one location (ex. One overlay is "Events East" and one is "Events West"). You want to embed this calendar into two separate websites, but you only want the "Events East" overlay to be displayed initially on one site and the "Events West" overlay to be displayed initially on the other site. You can do this with this very specific parameter: "&ovoff=calendar#."
The "#" is replaced by the number of the calendar that you do not want to be displayed. Each calendar in your account has a unique number and you will need to copy it from the link for your calendar. To find your calendar number follow the steps below:
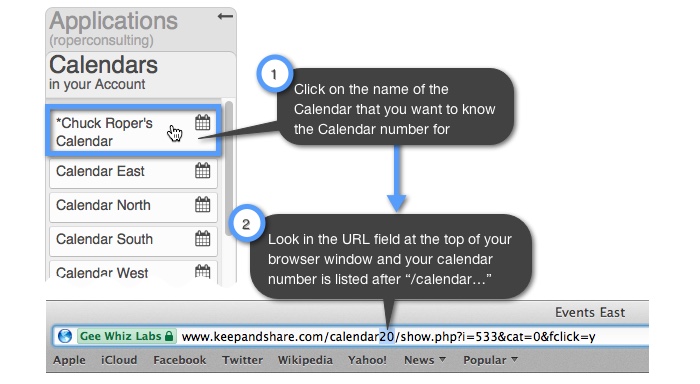
First you will need to find the calendar number for your two calendar overlays. In this example, the calendar number for "Events East" is "20" and the number for "Events West" is "25."
In your first website page, you only want the "Events East" Calendar Overlay displayed initially, so you will need to turn off the "Events West" overlay. You will need to copy the embed code for your main calendar (ex. "Acme Events") that has both the "East Events" and "West Events" on it as Calendar Overlays. Your code will look similar to the code below with the added URL parameter highlighted in yellow.
HTML Example:
<iframe src="https://www.keepandshare.com/calendar19/show.php?i=533&ifr=y&colorreset=y&vw=month&themeChoice=0&md=30&nopopup=n&fsz=11&noviewmenu=y&noname=y&nobreak=y&noprint=y&norequest=n&nosearch=y&norss=y&noovl=n¬z=y&fd=n&sa=y&exedit=n&nonav=n&scroll=y&ovoff=calendar25" width="100%" height="600" scrolling="yes" frameborder="1"></iframe>
Once your calendar is embedded, it will look like this:
Example:

As you can see, the second Calendar Overlay for "Events West" is still part of the calendar, but it is turned off. Visitors to your calendar will have the option of turning that overlay back on.
In your second webpage, you only want the "Events West" Calendar Overlay to display initially, so your code will look similar to the code below. The added URL parameter is highlighted in yellow:
HTML Example:
<iframe src="https://www.keepandshare.com/calendar19/show.php?i=533&ifr=y&colorreset=y&vw=month&themeChoice=0&md=30&nopopup=n&fsz=11&noviewmenu=y&noname=y&nobreak=y&noprint=y&norequest=n&nosearch=y&norss=y&noovl=n¬z=y&fd=n&sa=y&exedit=n&nonav=n&scroll=y&ovoff=calendar20" width="100%" height="600" scrolling="yes" frameborder="1"></iframe>
Your embedded calendar will look like this:
Example:

Note: This parameter is "sticky" through a browser session. That means if your visitors are not viewing your calendar for the first time, the URL parameters of one calendar may override the other. Regardless, both of your overlays will still be available to that calendar.